Come learn with me!

Tag: FreeInquiry (Page 1 of 2)

Reflection

Through these art projects, I have learned so much about art and had fun while doing it. I have learned a lot about using techniques in art (especially shading). I also learned a lot about different websites to find resources for in the classroom.

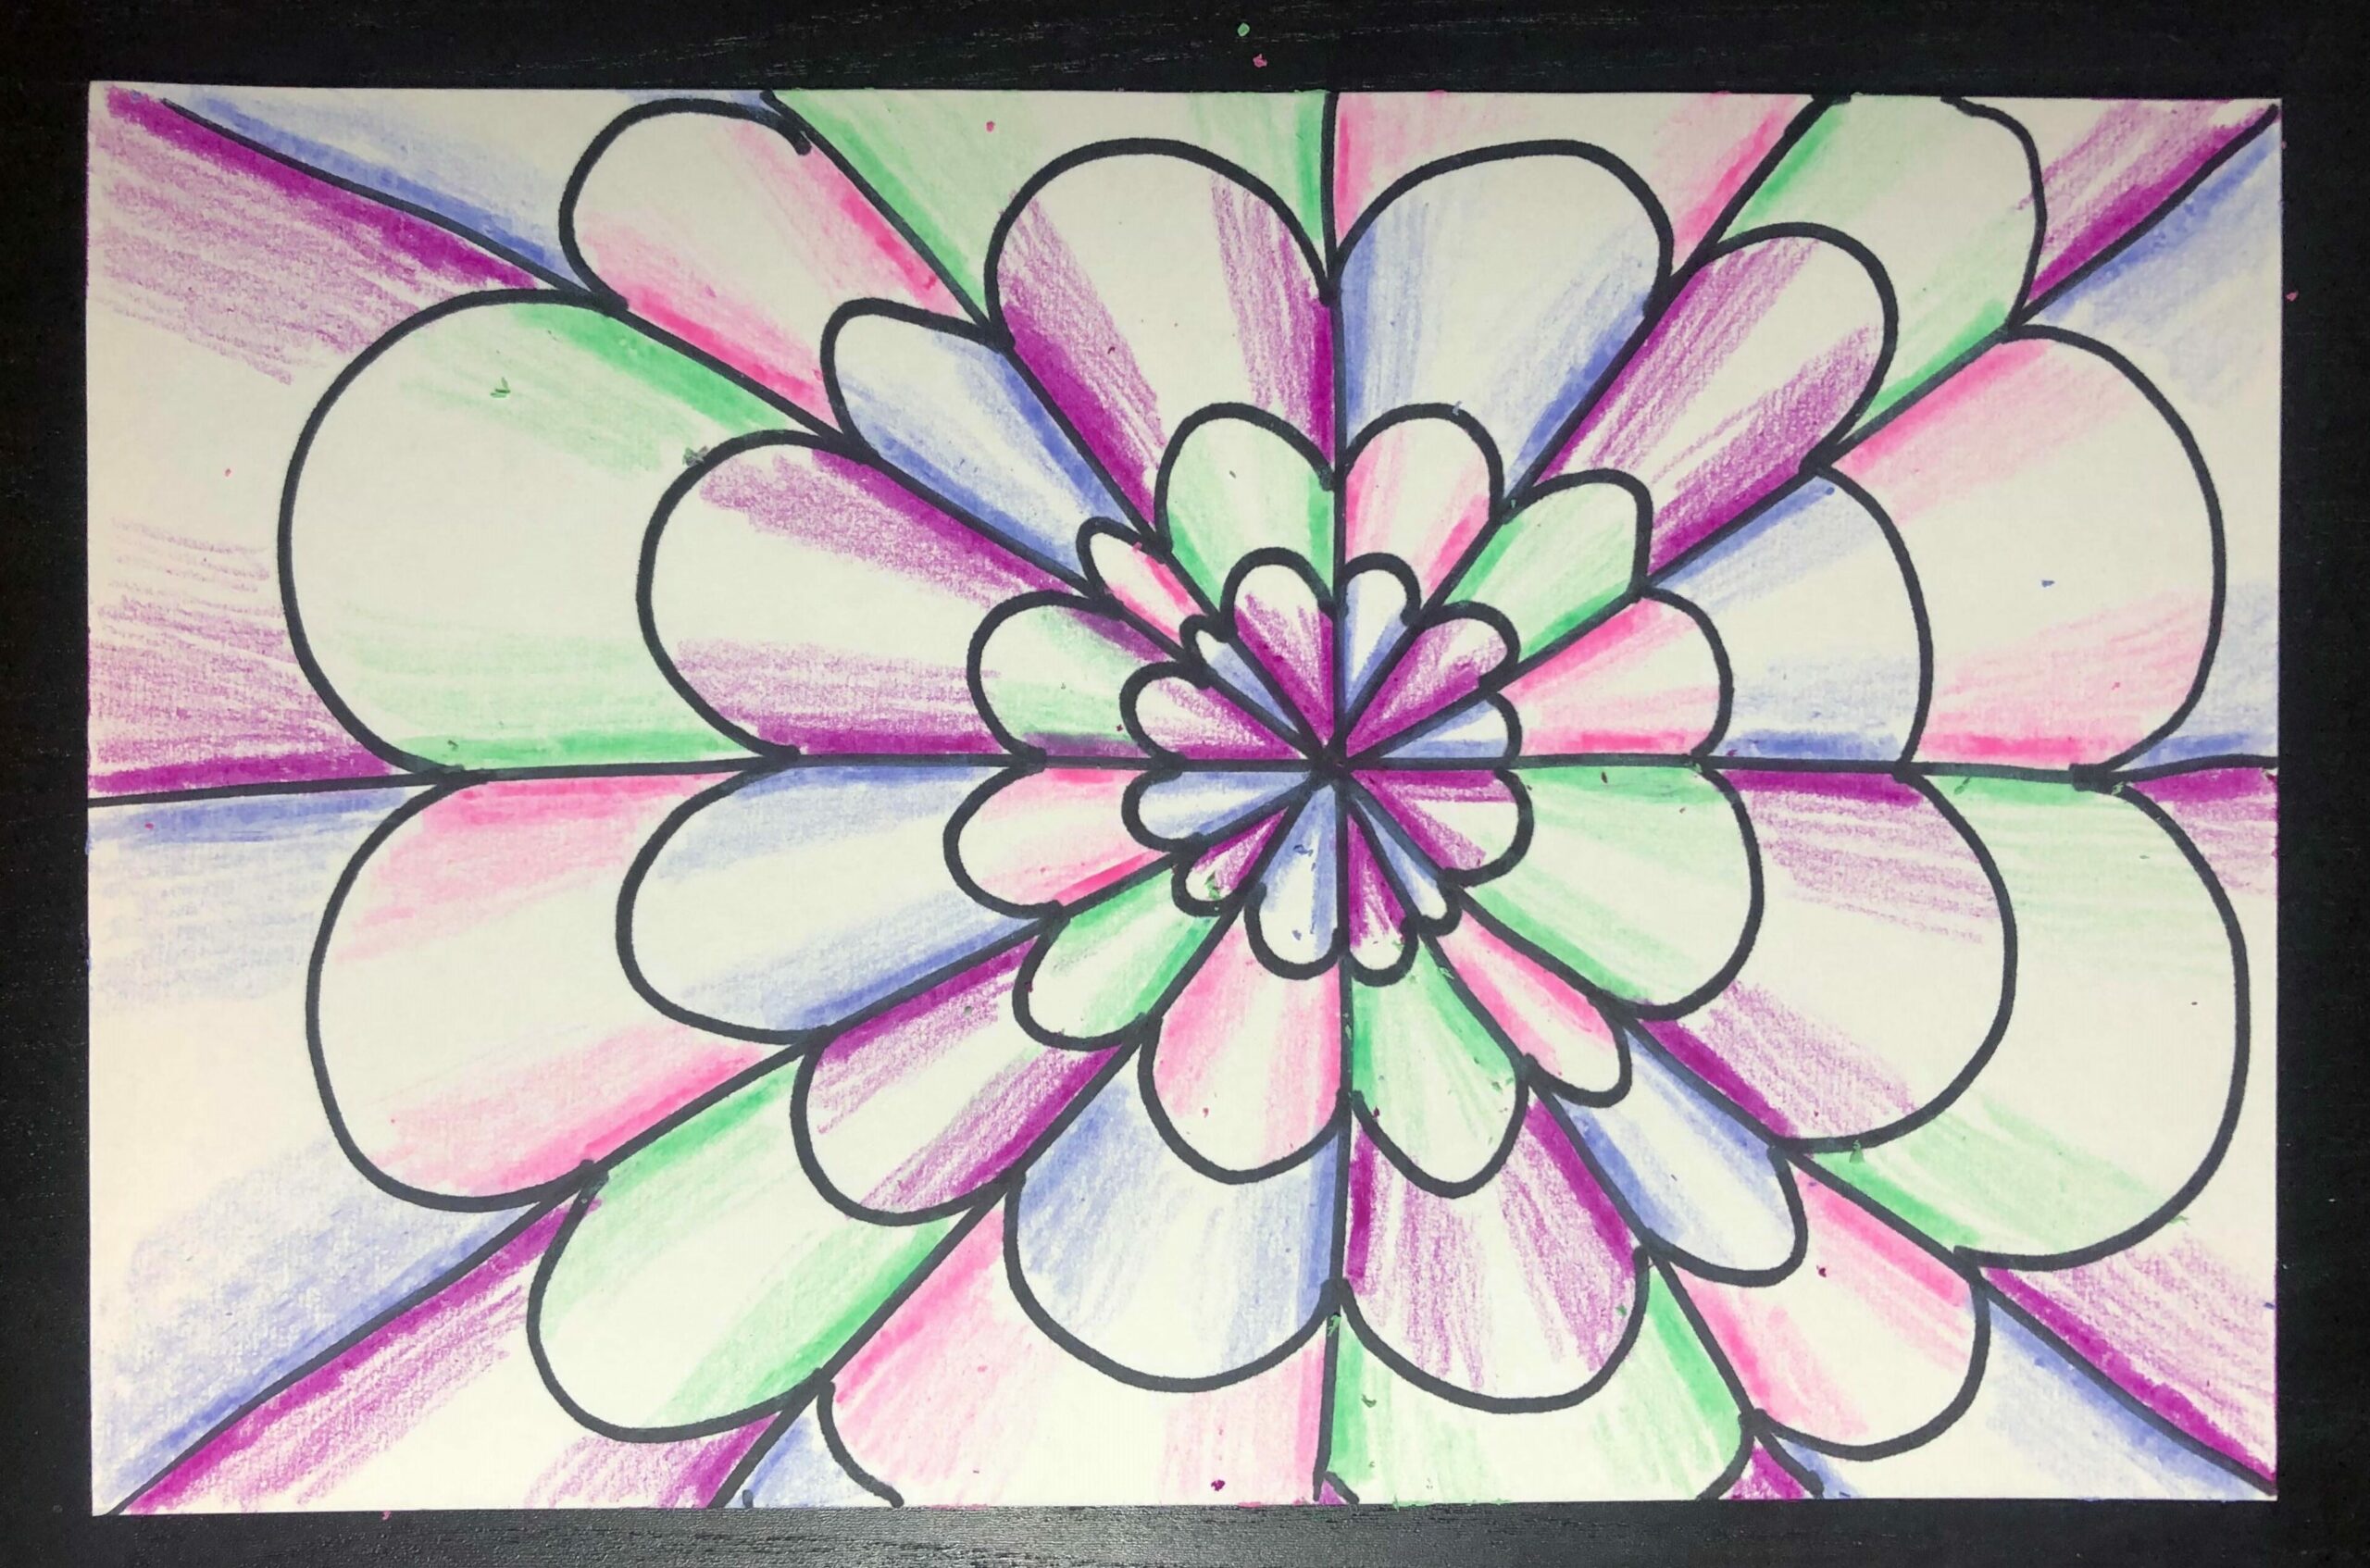
I have learned a lot of different techniques from going through these projects. Although I agree, the picture was usually better than mine, I really surprised myself with how many of these activities I was able to do. I am not typically an artistic person and don’t do well in art classes. However, when I was completing these projects, I was doing it for fun and not necessarily because I had to be the best in the class. This gave me time to work on my technique, as well as have fun doing art as I used to in elementary school. I think that since I have practiced all of these projects, I will be a better art teacher because of it. I already have an art lesson for almost every grade.

I also learned how to collect resources from different websites. Throughout this project, I needed to find different art projects to complete for each grade level. This task was exciting since I got to explore different platforms and learn about what are the benefits of choosing some platforms over others. For example, I found an art teacher on TikTok that posts what kind of lessons her kids are doing that day. I used to think of TikTok as only a recreational app, but I will be sure to consider it in the future for other assignments.

Out of all the places I found resources on (TikTok, Instagram, YouTube, Websites), I liked TikTok and YouTube the best. TikTok, since they are short one-minute videos giving me the basics of the activity. They still get the point across and they do not lose my focus. I liked YouTube since there was more time to explain the activity and I could see what the person was doing. On Instagram, there would typically only be pictures of the final project or a picture halfway through the activity. This left me guessing as to what techniques and materials they actually used to complete the work. Websites are in the middle of TikTok/YouTube and Instagram. I was able to get all of the information from their blogs, but I would have liked a video so I could see what was happening.

Extra Art

 It is finally spring and what is a better way to celebrate than by making tulips out of watercolour. Every year the tulips grow outside of my house, so I knew I had to make this project!

For this activity, I used these materials:

  • Watercolour paper
  • Watercolours
  • Scissors
  • Paintbrush
  • Printer paper
  • Glue
  • Acrylic or tempera paint

If I were to use this activity in a classroom, I would be sure I spread out the art through two days are at least have a break in between for the paint to dry. Since I was making this art by myself, I did not have to paint entire sheets of paper in one colour. Instead, I divided up a sheet into 5 flower heads and 5 stems. This will be the perfect amount for one work of art.

My cut sheets of paper.

Since this art project was posted on Instagram, I only had photos to guide me through the process. This was a little more challenging than the other projects I have done since I had to guess the steps in this craft.

After I cut all of the papers, I coloured them individually. I decided to delve more into colour; so three flowers are going to be in warm colours (red, orange, yellow) and two flowers are going to be in cool colours (green, blue, purple). I also used darker shades of the colour within the original colour to add some texture or charecter to the painting. I am hoping that this will make my final results cooler!

Here are the colours I have chosen. Purple was placed somewhere else to dry.

I then cut out the tulip shapes and glued them down on the paper. I draw the outline on the back of the paper so that I wouldnt have black marks on my flowers if I cut them differently.

After I glued down my flowers.

After I glued down my flowers, I decided to take out the watercolour paints and splatter the paint. I only used three colours, I thought anymore would make the painting too crowded. To flick the paint, I took a paintbrush with watercolour on it and used my thumb to pull back the bristles. If your thumb moves towards you, you won’t get hit by paint!

Splattering the paint.
The finished project!

Pros:

  • Nice spring activity. The colours are bright and it makes me happy that Spring is finally here.
  • I liked painting the colours on the paper first and then using them to cut out the Tulips. I think this was a much better alternative than construction paper since everyone can decorate their own sheet however they want and then we can share as a class. It also gives students the opportunity to experience mixing colours.
  • Involves organic and geometric shapes. The stems are all rectangles and the Tulips are an organic shape. This could be an introductory lesson to a shape unit.

Cons:

  • Splattering the paint is really messy. The drops are all really small so it is hard to see what you got it on. The teacher would need to prepare before doing this in their class.
  • Glueing watercolour paper onto printer paper doesn’t work. The watercolour paper had bent a bit from getting wet and the edges didn’t stick down to the printer paper sheet.
  • The activity would take a couple of days since the painting of the paper would take a while to dry and then splattering the paint would take a while to dry.

I would use this activity in a class! It is a really nice way to bring Spring into the classroom; I can only imagine how pretty these would look covering a classroom’s walls. There are many different curricular competencies that could be applied here, such as connections to shape and colour.

Grade Seven

This activity reminds me of when I was in elementary school and my teacher had just shown us how to make a 3-D hand drawing. Many of the lines in that art piece looked the same as this one. I chose this art piece since the shading and the pattern just look super cool.

Materials:

  • Paper
  • Crayons
  • Sharpie

To start this activity, I divided the sheet of paper into six sections. I then went around in a circle creating an upside-down ‘U’ shape in each of the sections. In the video, it was pointed out that the more circular the lines are, the more 3-D the end result will look. Each ‘U’ has to connect at both ends, but it is not a spiral, to ensure this happened I went around each segment before moving onto the next (pictured below).

Afterwards, I began colouring. The colouring in this activity was a lot less challenging than I anticiapted. Looking at the drawing, it looks more complicated since there is a lot of shading. However, once I watched the video I noticed that all I needed to do was press hard on the crayon on the outside (near the lines), and softer towards the centre. The centre of each segment was left completely white, so that it looks more highlighted and 3-D.

The final project!

Pros:

  • The colours and the shapes could be elaborated on in an art unit. Since there is both organic shapes and they are all coloured, students could pick a colour group and stick to those colours.
  • Helps teach shading in a simple way. The shading was not hard to do in this activity since all I had to do was press hard in the edges and use a lighter touch towards the centre.

Cons:

  • When you press hard on the crayons you risk breaking them. I broke the purple crayon while completing this activity; although it is not as bad as the scratch art.

I would definitely use this activity in a future classroom. There are practically no cons to doing this and the end result is great! It is really simple but looks complicated which I think the students will like. As I mentioned before, this activity could be used to cover colour or shape; however, it can also be used cross-curricularly in math by incorporating a lesson on patterns before starting.

Grade Five

Throughout the semester, in my art class, we used pastels quite frequently. We often had to find a way to blend them as well or else we would get harsh streaks over our pictures. I had heard about people using this technique, but I had never tried it for myself. It makes sense that oil would blend out our pastels, but I always tried to press harder with the pastels rather than getting the extra ingredient.

Here are the materials:

  • Oil pastels of assorted colours
  • Watercolour or thicker paper
  • Q-Tips
  • Vegetable Oil

Before trying out this activity, I saw this sample on the website and decided that I would try to recreate it with more colours.


Their example.

I started off by drawing in the circle and then sprouting lines from it; almost like a sun.

I then used oil to blend out the lines like in the example above.

Blending out the green.
The final result!

Pros:

  • Really fun to do and teaches blending to students in a fun way. When I try to draw, I still do not know how to blend or shade. This is a really fun activity to learn since it lets you know how much pressure to put on the Q-Tip and it blends out easier than a pencil would.
  • Creates a new medium for people to work with. Instead of just pastels, or just paint, students can use pastels and colour like paint. This will make it easier to draw figures since you can draw with the crayon but shade and colour with the oil.

Cons:

  • You need to make sure there is enough oil on the Q-Tip, but not too much. If there wasn’t enough oil on the Q-Tip, the pastel wouldn’t blend and it was really hard to move the colours around. However, if you add too much oil onto the Q-Tip, then the oil seeps through the paper and you are left with stains that take away from the art.
  • If oil spills, it is really hard to clean up. If this were to be done in a younger class and the students’ spill, it would be really hard to clean since oil is really greasy. Although, this is also a risk teachers take when using pastels in a classroom.

In the end, I think I would use this activity in a classroom. It is simple enough to do and gives a whole new meaning to pastel art. In fact, I wish I knew this hack earlier in the semester so I would not have to ruin my pastels while I was blending.

Grade Four

This project is such a cute idea and can be used in many different ways! It can be used for stickers, of course, but when I was in grade 12, we made these for collages. In our collages we would add paper down first, and then we would put these stickers ontop since they were translucent. My art teacher at the time also had an assortment of magazines to choose from, so we could use whatever design we wanted.

Materials:

  • Black and white photo
  • Packing tape
  • Scissors
  • Container
  • Water

This activity is fun since it can be used in multiple different ways, it is also super fast. All you need to do is find photos you like, this works really well with magazines but printed photos work just as well. Once you have selected the photo, cover it in packing tape and smooth it down so there are no bubbles (this will create gaps in your sticker). Then cut out your paper so you are just left with the design.

Afterwards, fill up your container with water and place your taped design inside. This will make it easier for the paper to come off later.

My design sitting in the water.

When the paper starts to peel off the back, use your fingers to feel it off gently.

Pros:

  • Really easy activity if you need something extra to do in an art class. Have all the students taking turns picking photos from magazines and off the internet to make a sticker from.

Cons

  • Doesn’t work well with coloured ink from the printer. I tried making a blue butterfly before I made the sticker in the pictures. The blue peeled off with the paper.
  • After you have peeled off the paper, there are still litte fibers stuck to it. This would not be too much of a problem if the sticker wasn’t see through. It makes the sticker look dusty.

In the end, I would make this project with a class. The stickers are really cool and the kids will all be amazed when the activity works out, I know I was when I first saw it. This activity is quick and simple and elevates an art piece to the next level. This activity would be good to teach line and movement since you do not need colour and you can print off a good example piece.

Grade Three

This grades activity is really exciting, but I am a little dissapointed in how it turned out. Since it was recently Easter, I decided to take on an Easter craft and make these wax resist eggs. Here’s the TikTok that inspired me:

To make the wax resist eggs, I used:

  • Watercolour paper
  • Watercolour paint
  • White and black crayon
  • Paintbrush
  • Optional: a white or black pastel

All of the drawing in this project is done in crayon. Since the crayon is made of wax, the watercolour avoids is leaving white in the space it was drawn on. I started off by drawing the outline of the egg in black crayon and then added in some details with the white crayon. The white details are considered “invsible”, and should show up when the paint is on it!

My egg outline with invisible details.

Afterwards, I took my watercolour paints and drew stripes all over the surface. This helped expose the white lines!

Me revealing the secret designs on my egg!
The end product!

Pros of the activity:

  • Easy enough to do with very little clean-up. Crayons are easy for children to use and watercolour paints come out of tables with more water.
  • Really cool to see the design appear out of no where!
  • Allows students to learn shapes, colours, line, movement, etc.

Cons:

  • I’m a little disappointed in my final piece. you can see the design, but it looks muted compared to the version in the video. Maybe my paints weren’t diluted enough so they topped the crayon.
  • I used pastels instead of crayons. When the art was not turning out as I had hoped, I tried to use oil pastels and see if they worked. They worked better but I had used them with other colours in the past and you could see it in the white making them no longer invisible.

I don’t know whether I would use this project in my classroom. At the moment, I would say no. If I could not get the white vibrant enough, I doubt a child in grade three could. It it a fun idea and concept but until I can get it to work, I do not want to use it in my classroom.

Grade Two

As an art project for grade two, I have decided to make scratch art! This is super exciting since I used to play with scratch art paper all the time when I was younger. What makes this more exciting than then, is that it is 100% made by me. For this assignment, I was inspired by this TikTok video:


For this project, I used the following materials:

  • Watercolour paper
  • Black Paint (I used acrylic)
  • Dish soap
  • Multi-coloured Crayons
  • A paintbrush
  • A toothpick or skewer

As I’ve mentioned before, this activity was a lot of fun to do. I was able to choose the colours of the background and create a fun design.

My design before I painted the black on top!

I was really worried when I was painting over all of the crayons with black paint, I thought it would stick onto the crayon. But it didn’t and I managed to scratch it off. The scratching was smooth, although sometimes chunks wouldn’t come off, I just retraced the lines and the line turned out sharp and smooth.

My final result!

Some pros of this activity are:

  • Lots of fun to complete! Students will have a fun time designing the background colour and have just as much fun scraping off the black paint. It was so satisfying I almost found it hard to stop!
  • Easy to complete and not much mess. Of course with paint, there is some mess to be expected. However, with this activity, I didn’t find the paint getting everywhere. I am also not in grade two, so it might depend on the students in the class.
  • Smells better than regular paint. Since you need to mix the dish soap with the black paint, my room did not have the strong paint smell it typically gets when I paint. Instead, it smelled like dish soap!


Cons:

  • Instructions were unclear as to whether I should add multiple coats of black. I did not end up using more than one coat since I did not want to make the top layer too thick. However, if you look closely at my picture, you can see some of the colour peeking through.
  • While colouring with the crayons, I needed to press hard on the paper to ensure all of the holes were covered and there were no white spots. This ended up using the entire head of my crayons. If you have 30 students completing this activity, prepare for some used and broken crayons.

In the end, I would use this project in my classroom! It is a lot of fun to complete and can be used to teach colour, line, movement, and different artists easily within the classroom. There are not too many cons when it comes to this activity and it did not take a lot of energy to set-up!

Grade One

This piece was a lot of fun to create! I enjoyed using the watercolour paints and it was simple enough to do. This assignment also breaks down line and movement really well for a student in grade one. When I first heard of movement, I thought it was when the art looked like it was moving. However, movement is when lines or something draw your eye to a certain part of the picture. In this demonstration, the five different lines are drawing my eye to the star!

For this project, I used the following materials:

  • Watercolour paper
  • Watercolours
  • Paintbrush
  • Pencil
  • Eraser

I loved creating this art and think it would be great for a grade one class. The steps are all easy to follow and fun to complete. I started off by sketching the entire piece in pencil. Afterwards, I outlined it in sharpie. As you can see in the photo below, I did not trace over the pencil perfectly. This is when I deviated from the video and decided to take out my eraser and remove the lines; I think it looks much better!

I then traced over all of the lines with watercolour paint and I was left with this:

The final product!

Pros:

  • As I mentioned before, this is a great way to start teaching line and movement to a younger class. You can explain that the lines guide the eye over the the butterfly in the corner.
  • There is still lots of experimentation within the project. Although most of the art is going to end up looking the same, everyone in the class can have a different object in the corner, different lines, or different colours.
  • When picking colours, you could bring in emotion and colour and have the students use colours that they believe represent the emotion of the line.

Cons

  • The activity may be too simple. Since the students are drawing an object in the corner and lines from it, it may be too simple of an activity to engage them.

I would definitely use this activity in a class. It teaches movement and line really well and the pros definitely outweigh the cons. It is also an easy enough activity that will introduce students to the topic but will not take all day to complete.

Kindergarten

This activity was interesting. When I was in elementary school, my mom used to make playdoh for us all the time. She would add essential oils to make it smell nice and we would get to choose our own colours, it was a really fun craft to make. However, her recipe needed to be made over the stove, which is when I first started questioning the version from this TikTok.

Of course it could just be a different recipe; however, this version did not turn out as well as the versions I had made in the past.

The materials I used are:

  • Oil
  • Flour
  • Water
  • Food colouring (optional, I didn’t use any)
  • Spoon
  • Bowl
  • Measuring Utensils

Now your probably thinking, that sounds a lot like the ingredients for dough, like food dough. And you wouldn’t be wrong. If I added some yeast to this recipe I’m sure I could make some type of bun. I still tried out the recipe anyways.

Firstly, I added all the ingredients into the bowl. I added the oil and flour and then added in the water. I didn’t have any food colouring at my house, so I decided to skip this step.

Afterwards, I mixed the dough together with a spoon and then kneaded after all the flour had been mixed in. When I kneaded the dough, there were a couple of hard bits in it. The dough could have found a couple of crumbs from my counter, but I believe it was flour, water, and oil that mixed weirdly. When kneading the dough, I noticed something was wrong. The dough was still really sticky and when I touched it, there was oil residue on my hands. Also when I stretched it, the playdoh looked like this:

It looked like pizza dough, except stickier.

For this activity, I think it is safe to say I do not need a pros and cons list. The end product is not like the video entailed and it left my hands oily and the counter sticky. I think the students would love this activity if we did it as a class, however, there would be a lot of cleanup involved. If done correctly, this activity could still teach texture, but you would knead a recipe that works.

Why I’m Switching Topics…

As you have probably noticed, using French as an inquiry project was not working out. I was no longer engaged or excited to come up with new blog topics each week and this project became something I was dreading to do. To help with that, I decided to change my topic! My new topic is now elementary art projects!

Photo by National Cancer Institute on Unsplash

I decided to choose this topic instead since I was having so much fun in my weekly art class. In art, we would get to complete a weekly art assignment for our art portolios. I have not completed an art assignment since I was in Grade eleven, so I am excited at the opportunity to start again.

In this inquiry, each week I am going to try and make a new art piece. I have found a whole bunch of artists and art teachers on different platforms that I will be able to take inspiration from. I have found different, websites, tiktoks, instagram posts, and youtube videos that show how to create different pieces of art.

Since I am making these all myself, I am also going to decide whether I would actually use them within my classroom and give some pros and cons to the different activities. This will just be from my experiences in classrooms and around students. I have never been on a practicum before, so I may decide that these activities are perfect in the future, when I get into a classroom.

I am so excited to share my journey with you and hope you are excited to follow along!

“And when things start to happen, don’t worry, don’t stew. Just go right along, you’ll start happening too!”

Dr. Suess


« Older posts